Middleware for IoT / M2M - Semestre 9
Annee academique : 2024-2025 Enseignant : T. Monteil (LAAS-CNRS) ECTS : 2.5 Categorie : IoT, Protocoles de communication, Middleware
Cours connexes :
- Security for Connected Objects - S9 - Securisation IoT
- Cloud & Edge Computing - S9 - Architectures IoT
- Wireless Sensors Networks - S9 - Reseaux de capteurs
PART A - Presentation Generale
Vue d'ensemble
Le cours “Middleware for IoT / M2M” aborde les architectures logicielles intermediaires (middleware) et les protocoles de communication dedies a l’Internet des Objets (IoT) et aux communications Machine-to-Machine (M2M). Il couvre l’ensemble de la chaine, depuis les protocoles de messagerie leger comme MQTT jusqu’aux standards de gestion de ressources comme oneM2M, en passant par le prototypage rapide d’applications IoT avec Node-RED.
L’objectif est de former des ingenieurs capables de concevoir, deployer et integrer des systemes IoT complets, en maitrise des protocoles de communication adaptes aux contraintes des objets connectes (bande passante limitee, consommation energetique, fiabilite).
Objectifs pedagogiques :
- Comprendre les principaux standards de l’Internet des Objets (MQTT, oneM2M, CoAP)
- Deployer et configurer des architectures IoT avec broker MQTT et CSE oneM2M
- Programmer des microcontroleurs (NodeMCU/ESP8266) pour communiquer via MQTT
- Concevoir des applications IoT avec Node-RED (prototypage rapide)
- Comparer et choisir les protocoles adaptes aux cas d’usage IoT (HTTP vs MQTT vs CoAP)
- Integrer capteurs, actionneurs et dashboards dans une architecture IoT complete
- Analyser les enjeux de securite, scalabilite et interoperabilite des systemes M2M
Position dans le cursus
Ce module s’appuie sur les bases acquises anterieurement :
- Reseau (S5-S8) : modele OSI, TCP/IP, HTTP, sockets
- Microcontroleurs (S5-S7) : programmation embarquee, Arduino
- Systemes d’exploitation : Linux, scripts Python
Il prepare et se connecte a :
- Cloud et Edge Computing (S9) : deploiement d’architectures distribuees
- Security for Connected Objects (S9) : securisation des communications IoT
- Wireless Sensors Networks (S9) : couches physiques et liaison des capteurs
- Projet Innovant (S9) : integration des protocoles IoT dans un projet reel
PART B - Experience et Contexte
Organisation et ressources
Le module combinait cours theoriques et travaux pratiques progressifs :
Cours magistraux :
- Architecture IoT et pile protocolaire
- Protocole MQTT : principes, QoS, topics, retain, last will
- Standard oneM2M : architecture, ressources, CSE, AE
- MOOC oneM2M (formation en autonomie)
- Comparaison des protocoles IoT (HTTP, MQTT, CoAP, AMQP)
- Patrons de communication M2M (publish/subscribe, request/response)
Travaux pratiques (TP) :
- TP1-2 : Installation et configuration du broker MQTT Mosquitto, communication publish/subscribe, programmation NodeMCU/ESP8266 avec ArduinoMqttClient
- TP3 : Standard oneM2M avec ACME CSE, creation de ressources (AE, Container, ContentInstance) via API RESTful, script Python simple_om2m.py
- TP4 : Prototypage rapide avec Node-RED, integration MQTT, dashboard, gestion de capteurs et actionneurs, notifications email
Bureau d’Etudes (BE) :
- Projet BE M2M : mise en oeuvre d’une architecture complete M2M integrant MQTT, oneM2M et Node-RED
Outils utilises :
- Mosquitto : broker MQTT open-source
- Arduino IDE : programmation ESP8266/NodeMCU
- Node-RED : outil de prototypage visuel
- ACME oneM2M CSE : implementation open-source du standard oneM2M
- Python : scripts d’interaction avec les API oneM2M
- cURL / Postman : test d’API RESTful
Ressources :
- MOOC oneM2M (planning et contenu en autonomie)
- Sujets de TP detailles (MQTT, oneM2M, Node-RED)
- Documentation Mosquitto, ACME CSE, Node-RED
- Sujet et presentation du BE M2M
Methodologie d'apprentissage
Phase 1 : Comprendre les fondamentaux : Etudier l’architecture IoT, les modeles de communication (publish/subscribe vs request/response) et les contraintes specifiques des objets connectes.
Phase 2 : Maitriser MQTT : Installer un broker, tester la communication en ligne de commande, puis programmer un microcontroleur pour publier et s’abonner a des topics.
Phase 3 : Decouvrir oneM2M : Comprendre l’arbre de ressources, deployer un CSE, creer des Application Entities et des conteneurs via API REST.
Phase 4 : Prototypage rapide : Utiliser Node-RED pour integrer tous les elements (capteurs, MQTT, dashboard, notifications) en un systeme fonctionnel.
Phase 5 : Integration et projet : Combiner toutes les briques dans le BE M2M pour realiser une architecture IoT complete.
Mon role et mes responsabilites
Au cours de ce module, j’ai ete amene a :
- Installer et configurer le broker MQTT Mosquitto sur Linux
- Programmer un NodeMCU/ESP8266 pour la publication de donnees de capteurs (luminosite, etat bouton) via MQTT
- Deployer et interagir avec un CSE oneM2M (ACME) via des requetes HTTP RESTful en Python
- Concevoir des flux Node-RED integrant reception MQTT, logique de controle, dashboard et notifications
- Rediger des rapports techniques detaillant les architectures deployees et les resultats obtenus
Difficultes rencontrees
Configuration reseau du broker : La mise en place de Mosquitto avec les bons parametres d’ecoute et d’authentification a necessite plusieurs iterations pour fonctionner correctement avec le NodeMCU.
Programmation ESP8266 : L’integration de la bibliotheque ArduinoMqttClient avec la gestion WiFi sur le NodeMCU a demande une bonne comprehension du cycle de vie de la connexion.
Standard oneM2M : La richesse du standard oneM2M (nombreux types de ressources, droits d’acces ACP, structure hierarchique) est intimidante au debut. La documentation du MOOC a ete essentielle pour progresser.
Integration Node-RED : La coordination entre les noeuds MQTT, les fonctions JavaScript et le dashboard a necessite du temps de mise au point pour obtenir un systeme reactif et fiable.
PART C - Aspects Techniques Detailles
1. Protocole MQTT - Architecture et principes
MQTT (Message Queuing Telemetry Transport) est un protocole de messagerie leger, concu pour les environnements contraints (bande passante limitee, ressources reduites). Il repose sur le modele publish/subscribe avec un intermediaire central appele broker.
Architecture MQTT :
| Composant | Role | Description |
|---|---|---|
| Publisher | Emetteur | Publie des messages sur des topics |
| Subscriber | Recepteur | S’abonne a des topics pour recevoir les messages |
| Broker | Intermediaire | Gere la distribution des messages entre publishers et subscribers |
| Topic | Canal | Chaine hierarchique identifiant le sujet du message (ex: sensor/temperature) |
| Message | Donnee | Contenu publie sur un topic (payload) |
Principes du publish/subscribe :
- Les publishers et subscribers sont decouplees : ils ne se connaissent pas directement
- Le broker se charge du routage des messages selon les abonnements
- Un publisher peut publier sur plusieurs topics
- Un subscriber peut s’abonner a plusieurs topics avec des wildcards (
+pour un niveau,#pour tous les sous-niveaux)
Fonctionnement detaille :
- Le subscriber s’abonne a un topic aupres du broker (ex:
insa/luminosity) - Le publisher publie un message sur ce topic
- Le broker transmet le message a tous les subscribers abonnes a ce topic
- Le decoupage hierarchique des topics permet une organisation flexible (ex:
building1/floor2/room3/temperature)
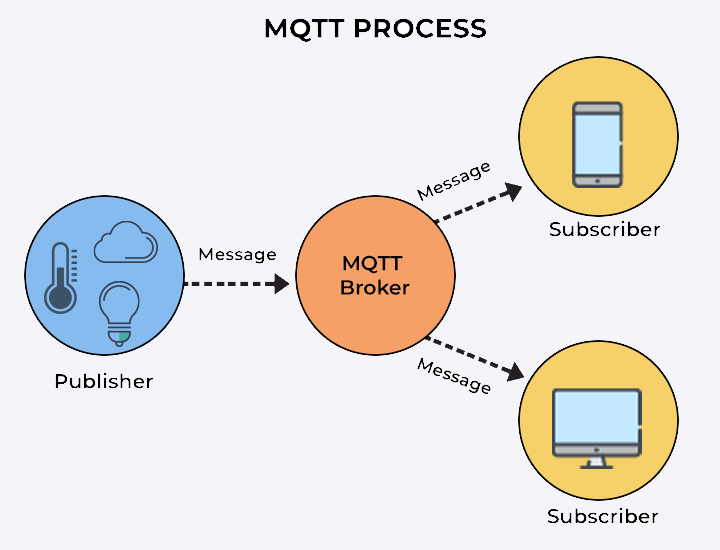
Figure : Architecture MQTT - Modele publish/subscribe avec broker central
Niveaux de QoS (Quality of Service) :
MQTT propose trois niveaux de qualite de service pour la livraison des messages :
| QoS | Nom | Garantie | Usage |
|---|---|---|---|
| 0 | At most once | Aucune garantie, “fire and forget” | Donnees non critiques, telemetrie frequente |
| 1 | At least once | Message livre au moins une fois (doublons possibles) | Donnees importantes, tolerance aux doublons |
| 2 | Exactly once | Message livre exactement une fois (handshake en 4 etapes) | Donnees critiques (facturation, commandes) |
Autres fonctionnalites MQTT :
- Retain : le broker conserve le dernier message d’un topic et l’envoie a tout nouveau subscriber
- Last Will and Testament (LWT) : message automatiquement publie par le broker si un client se deconnecte anormalement
- Clean Session : le client peut demander au broker de conserver ou non ses abonnements entre connexions
- Keep Alive : mecanisme de ping periodique pour detecter les deconnexions
Securite MQTT :
- Authentification par nom d’utilisateur / mot de passe
- Chiffrement TLS/SSL pour la confidentialite des echanges
- Listes de controle d’acces (ACL) pour restreindre l’acces aux topics
- Port standard : 1883 (non chiffre), 8883 (TLS)
Protocole de transport : MQTT fonctionne au-dessus de TCP/IP, ce qui garantit une communication fiable avec un overhead minimal. La taille de l’en-tete MQTT est de seulement 2 octets minimum, ce qui le rend ideal pour les reseaux contraints.
2. Installation et test du broker MQTT Mosquitto
Mosquitto est l’implementation open-source de reference du protocole MQTT. J’ai installe et configure le broker sur un environnement Linux, puis teste la communication publish/subscribe en ligne de commande.
Installation et demarrage :
# Installation
sudo apt-get install mosquitto mosquitto-clients

# Demarrage du broker
mosquitto -v

# Abonnement a un topic
mosquitto_sub -h localhost -t "test/topic"

# Publication d'un message
mosquitto_pub -h localhost -t "test/topic" -m "Hello MQTT"
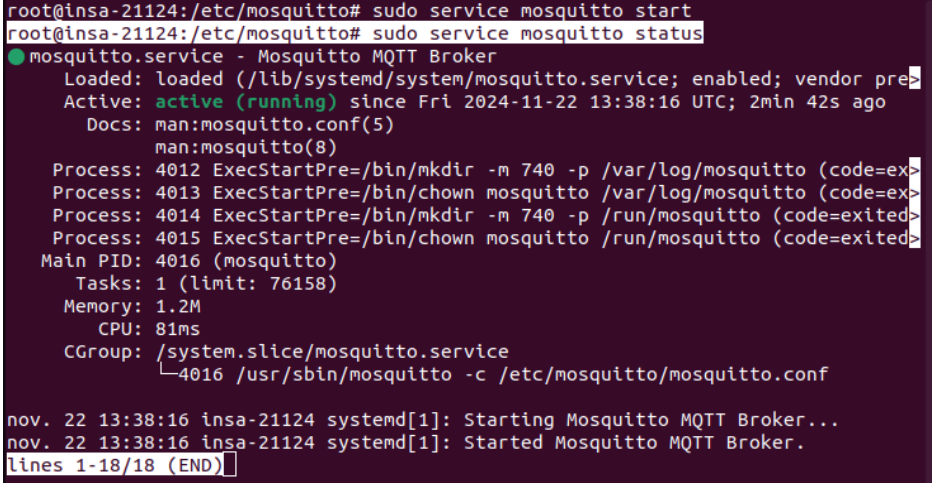
Figure : Demarrage du broker Mosquitto en mode verbose
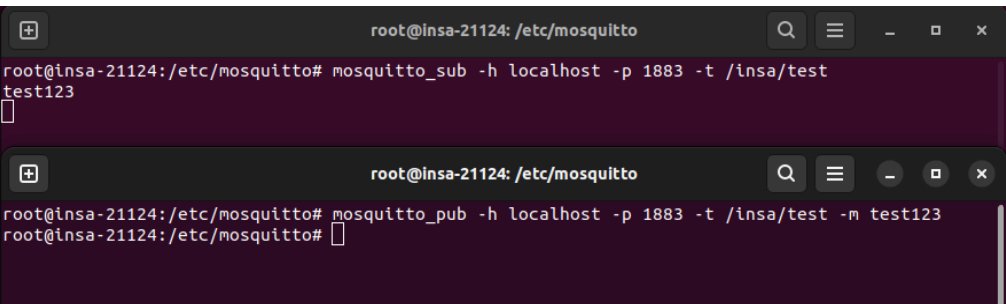
Figure : Test publish/subscribe avec mosquitto_pub et mosquitto_sub
Configuration avancee du broker :
- Fichier de configuration :
/etc/mosquitto/mosquitto.conf - Definition des ports d’ecoute, des parametres d’authentification
- Configuration des ACL pour controler l’acces aux topics
- Activation du logging pour le debogage
Les tests ont permis de valider le bon fonctionnement de la chaine de communication : le subscriber recoit instantanement les messages publies par le publisher via le broker, confirmant le modele asynchrone du publish/subscribe.
3. Programmation NodeMCU/ESP8266 avec MQTT
Le NodeMCU est une carte de developpement basee sur le microcontroleur ESP8266, integrant un module WiFi. J’ai programme cette carte pour qu’elle communique via MQTT avec le broker Mosquitto, en utilisant l’Arduino IDE et la bibliotheque ArduinoMqttClient.
Caracteristiques du NodeMCU/ESP8266 :
- Processeur 32 bits a 80 MHz
- WiFi 802.11 b/g/n integre
- GPIO, ADC, PWM, I2C, SPI
- Programmable via Arduino IDE
- Ideal pour le prototypage IoT
Fonctionnalites implementees :
- Connexion WiFi : le NodeMCU se connecte au reseau WiFi local
- Connexion MQTT : etablissement de la connexion avec le broker Mosquitto
- Publication de l’etat du bouton : a chaque pression sur le bouton physique, publication de l’etat sur le topic
button/state - Publication de la luminosite : lecture du capteur de luminosite (ADC) et publication sur le topic
light/statea chaque pression du bouton - Abonnement a des topics : reception de commandes depuis d’autres dispositifs
Extrait de la logique de programmation :
// Connexion WiFi
WiFi.begin(ssid, password);

// Connexion au broker MQTT
mqttClient.connect(broker, port);

// Publication sur topic
mqttClient.beginMessage("button/state");
mqttClient.print(buttonState);
mqttClient.endMessage();

// Lecture luminosite et publication
int luminosity = analogRead(A0);
mqttClient.beginMessage("light/state");
mqttClient.print(luminosity);
mqttClient.endMessage();

Figure : Schema de l'application NodeMCU - publication des etats bouton et luminosite via MQTT
Points techniques importants :
- La gestion du debounce du bouton est essentielle pour eviter les publications multiples
- La reconnexion automatique au broker en cas de perte de connexion WiFi ou MQTT garantit la robustesse du systeme
- L’utilisation de QoS 1 pour les publications critiques assure la livraison des messages
4. Standard oneM2M - Architecture et ressources
oneM2M est un standard international pour les communications M2M et l’IoT. Il definit une architecture de middleware universelle permettant l’interoperabilite entre differents systemes IoT, independamment du reseau sous-jacent.
Architecture oneM2M :
| Composant | Sigle | Role |
|---|---|---|
| Common Services Entity | CSE | Fournit les services communs (enregistrement, decouverte, gestion des donnees, securite) |
| Application Entity | AE | Represente une application IoT qui interagit avec le CSE |
| Infrastructure Node | IN | Noeud serveur hebergeant le CSE principal |
| Middle Node | MN | Noeud intermediaire (passerelle) |
| Application Service Node | ASN | Noeud capteur/actionneur |
Arbre de ressources oneM2M :
L’architecture oneM2M organise les donnees sous forme d’un arbre de ressources hierarchique :
CSEBase (in-cse)
  |-- ACP (Access Control Policy)
  |-- AE (Application Entity - ex: Mon_AE)
  |     |-- Container (DATA)
  |     |     |-- ContentInstance (valeur capteur)
  |     |     |-- ContentInstance (valeur capteur)
  |     |-- Container (COMMAND)
  |           |-- ContentInstance (commande actionneur)
  |-- AE (Autre application)
Types de ressources principaux :
| Type | Code (ty) | Description |
|---|---|---|
| ACP | 1 | Politique de controle d’acces (droits CRUD + Notify + Discovery) |
| AE | 2 | Application Entity - represente une application |
| Container | 3 | Conteneur de donnees (structure hierarchique) |
| ContentInstance | 4 | Instance de contenu (donnee individuelle) |
| Subscription | 23 | Abonnement pour notification automatique |
Operations CRUD via API REST :
L’interaction avec le CSE se fait par des requetes HTTP RESTful :
# Creation d'une Application Entity
POST /~/in-cse/in-name
Headers: X-M2M-Origin: '', Content-Type: application/json;ty=2
Body: {"m2m:ae": {"api": "app.iot", "rr": "true", "rn": "Mon_AE"}}

# Creation d'un Container
POST /~/in-cse/in-name/Mon_AE
Headers: X-M2M-Origin: admin:admin, Content-Type: application/json;ty=3
Body: {"m2m:cnt": {"rn": "DATA"}}

# Creation d'un ContentInstance
POST /~/in-cse/in-name/Mon_AE/DATA
Headers: X-M2M-Origin: admin:admin, Content-Type: application/json;ty=4
Body: {"m2m:cin": {"con": "42"}}

# Recuperation du dernier contenu
GET /~/in-cse/in-name/Mon_AE/DATA/la
Headers: X-M2M-Origin: admin:admin, Accept: application/json
Droits d’acces (ACP) :
Les ACP definissent les permissions sur les ressources :
| Valeur | Permission |
|---|---|
| 1 | CREATE |
| 2 | RETRIEVE |
| 4 | UPDATE |
| 8 | DELETE |
| 16 | NOTIFY |
| 32 | DISCOVERY |
| 63 | Toutes les permissions |
ACME CSE :
Pour les travaux pratiques, nous avons utilise ACME, une implementation open-source du standard oneM2M developpee pour la recherche et l’enseignement. ACME fournit un CSE complet avec interface web, support HTTP/MQTT/CoAP, et une base de donnees locale.
5. Prototypage rapide avec Node-RED
Node-RED est un outil de programmation visuelle base sur Node.js, concu pour le prototypage rapide d’applications IoT. Il permet de creer des flux de donnees en connectant des noeuds graphiques, simplifiant considerablement le developpement et l’integration de systemes IoT.
Principes de Node-RED :
- Flux (flows) : enchainement de noeuds connectes representant le traitement des donnees
- Noeuds (nodes) : blocs fonctionnels (entree, traitement, sortie)
- Messages : objets JSON circulant entre les noeuds (
msg.payload,msg.topic) - Interface web : editeur visuel accessible via navigateur
- Extensible : milliers de noeuds communautaires installables via npm
Types de noeuds utilises :
| Categorie | Noeuds | Fonction |
|---|---|---|
| Entree | mqtt in, inject | Reception de messages MQTT, injection de donnees |
| Traitement | switch, function, change | Logique conditionnelle, transformation de donnees |
| Sortie | mqtt out, debug, email | Publication MQTT, affichage de debug, envoi email |
| Dashboard | gauge, chart, button, text | Composants d’interface utilisateur |
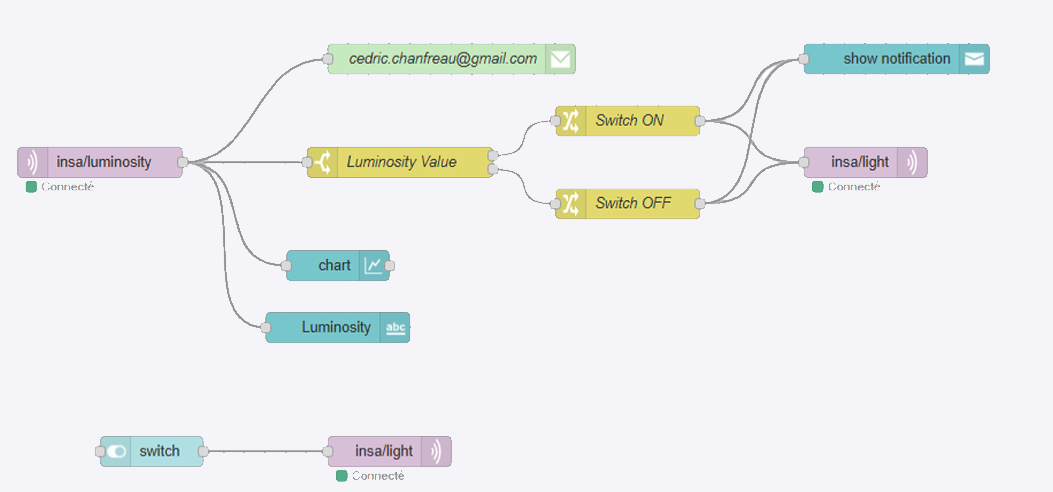
Figure : Flux Node-RED integrant reception MQTT, logique de controle et actionneurs
a. Verification de la connectivite MQTT
La premiere etape a consiste a ajouter un noeud mqtt in dans Node-RED, configure pour se connecter au broker Mosquitto et s’abonner au topic insa/luminosity. Le noeud debug a permis de confirmer la bonne reception des valeurs envoyees par le NodeMCU.
b. Gestion des capteurs et actionneurs
Un flux a ete cree pour simuler la logique de controle d’un systeme d’eclairage automatique :
- Un capteur de luminosite publie des valeurs sur MQTT
- Un noeud switch evalue la valeur recue :
- Luminosite > 50 : envoi de la commande LED ON
- Luminosite <= 50 : envoi de la commande LED OFF
- Le noeud mqtt out publie la commande sur le topic de l’actionneur
Cette logique illustre le patron de base d’un systeme IoT reactif : capteur → traitement → actionneur.
c. Dashboard de visualisation et controle
Grace au module node-red-dashboard, un tableau de bord interactif a ete cree pour :
- Visualiser les donnees des capteurs en temps reel (graphiques, jauges)
- Controler les actionneurs (boutons ON/OFF pour les LEDs)
- Surveiller l’etat du systeme (indicateurs visuels)


Figure : Dashboard Node-RED - visualisation capteurs et controle LED
d. Notifications email
Le module node-red-node-email a ete integre pour envoyer des alertes automatiques par email lors de :
- Changement d’etat du switch (ON/OFF)
- Depassement de seuil de luminosite
- Detection d’anomalies (valeurs aberrantes)
Ce mecanisme de notification proactive est essentiel dans les systemes IoT pour assurer une reaction rapide aux evenements critiques.
6. Comparaison des protocoles IoT : HTTP vs MQTT vs CoAP
Le choix du protocole de communication est une decision architecturale majeure dans tout projet IoT. Chaque protocole presente des avantages et contraintes specifiques.
| Critere | HTTP | MQTT | CoAP |
|---|---|---|---|
| Modele | Request/Response | Publish/Subscribe | Request/Response |
| Transport | TCP | TCP | UDP |
| Overhead | Eleve (en-tetes texte) | Faible (2 octets min) | Tres faible (4 octets) |
| QoS | Non natif | 3 niveaux (0, 1, 2) | Confirmable/Non-confirmable |
| Decouverte | Non | Non | Oui (ressource .well-known/core) |
| Observe | Non | Oui (subscribe) | Oui (option Observe) |
| Securite | TLS | TLS | DTLS |
| Usage typique | API web, REST | Telemetrie, notification | Objets tres contraints |
| Consommation | Elevee | Moderee | Faible |
| Latence | Moderee | Faible | Tres faible |
Quand utiliser quel protocole :
- HTTP : interactions ponctuelles, API REST, integration avec le web existant, oneM2M
- MQTT : telemetrie continue, notifications temps reel, communication entre de nombreux devices
- CoAP : objets a tres faibles ressources (capteurs sur batterie), reseaux 6LoWPAN, communication directe device-to-device
7. API RESTful pour l'IoT
L’architecture REST (Representational State Transfer) est au coeur de l’IoT moderne, notamment dans le standard oneM2M. Les principes REST appliques a l’IoT :
Principes REST :
- Ressources identifiees par URI : chaque capteur, actionneur ou donnee est une ressource adressable
- Operations CRUD via verbes HTTP :
- GET : lire une ressource (ex: valeur capteur)
- POST : creer une ressource (ex: nouvelle ContentInstance)
- PUT : mettre a jour une ressource
- DELETE : supprimer une ressource
- Representations : JSON ou XML pour encoder les donnees
- Sans etat (stateless) : chaque requete contient toute l’information necessaire
Application au standard oneM2M :
Dans oneM2M, l’arbre de ressources est accessible via des URL RESTful. Les en-tetes HTTP specifiques (X-M2M-Origin, Content-Type avec type de ressource) permettent au CSE d’identifier l’appelant et le type de creation demande.
8. Pile protocolaire IoT
L’IoT utilise une pile protocolaire adaptee aux contraintes des objets connectes :
| Couche | Protocoles standard | Protocoles IoT |
|---|---|---|
| Application | HTTP, FTP | MQTT, CoAP, AMQP, oneM2M |
| Transport | TCP, UDP | TCP (MQTT), UDP (CoAP) |
| Reseau | IPv4, IPv6 | 6LoWPAN, RPL |
| Liaison | Ethernet, WiFi | IEEE 802.15.4, BLE, LoRa, Sigfox |
| Physique | Cables, ondes | RF sub-GHz, 2.4 GHz |
Specificites de la pile IoT :
- 6LoWPAN : adaptation d’IPv6 pour reseaux de capteurs a faible puissance (compression d’en-tetes)
- RPL : protocole de routage pour reseaux de capteurs (arbre DODAG)
- IEEE 802.15.4 : couche liaison pour reseaux personnels sans fil a faible consommation
- Les middlewares comme oneM2M se situent au niveau applicatif et sont independants du reseau sous-jacent
9. Patrons de communication M2M
Les communications Machine-to-Machine suivent plusieurs patrons architecturaux :
1. Publish/Subscribe (MQTT) :
- Communication asynchrone via broker
- Decoupage spatial (publisher et subscriber ne se connaissent pas)
- Decoupage temporel (pas besoin d’etre connecte simultanement grace au retain)
- Ideal pour : telemetrie, notification d’evenements, distribution de donnees a N recepteurs
2. Request/Response (HTTP, CoAP) :
- Communication synchrone client/serveur
- Le client initie la requete, le serveur repond
- Ideal pour : lecture ponctuelle, commande d’actionneur, API REST
3. Observer (CoAP Observe, oneM2M Subscription) :
- Le client s’enregistre pour etre notifie des changements
- Le serveur envoie des notifications a chaque modification
- Ideal pour : surveillance continue, tableaux de bord temps reel
4. Pipeline / Data Flow (Node-RED) :
- Les donnees traversent une chaine de traitements
- Chaque noeud transforme ou filtre les donnees
- Ideal pour : ETL IoT, traitement de flux, prototypage
10. Prototypage rapide avec Node-RED - Approfondissement
Node-RED se revele un outil extremement puissant pour le prototypage IoT grace a plusieurs caracteristiques avancees :
Flux JSON exportable :
Les flux Node-RED sont serialises en JSON, permettant le versionnement (Git), le partage et le deploiement automatise. Lors du TP, nous avons exporte notre configuration dans le fichier Boukouiss_Chanfreau_Node-Red.json.
Noeuds personnalises (function) :
Le noeud function permet d’ecrire du code JavaScript pour des traitements complexes :
// Exemple : transformation de donnees capteur
var luminosity = msg.payload;
if (luminosity > 50) {
    msg.payload = "ON";
    msg.topic = "led/command";
} else {
    msg.payload = "OFF";
    msg.topic = "led/command";
}
return msg;
Integration multi-protocole : Node-RED supporte nativement MQTT, HTTP, WebSocket, TCP, UDP et peut etre etendu pour supporter CoAP, oneM2M, bases de donnees (InfluxDB, MongoDB), services cloud (AWS IoT, Azure IoT Hub).
Avantages pour le prototypage IoT :
- Developpement visuel accelerant la mise en oeuvre
- Test et debogage en temps reel (noeud debug)
- Dashboard integre pour la visualisation
- Modification a chaud sans redemarrage
- Grande communaute et ecosysteme de noeuds
PART D - Analyse Reflexive et Perspectives
Competences acquises
Maitrise des protocoles IoT : Comprehension approfondie de MQTT (publish/subscribe, QoS, broker), des API RESTful pour oneM2M, et des principes de CoAP. Capacite a choisir le protocole adapte selon les contraintes du projet.
Programmation embarquee IoT : Competence pour programmer un ESP8266/NodeMCU et l’integrer dans une architecture MQTT : connexion WiFi, publication/abonnement, gestion des capteurs et actionneurs.
Architecture middleware M2M : Comprehension du standard oneM2M, de l’arbre de ressources, des ACP, et de l’interaction avec un CSE via API REST. Capacite a deployer et configurer une infrastructure oneM2M.
Prototypage rapide : Maitrise de Node-RED pour concevoir des flux IoT complets, integrant capture de donnees, logique de traitement, dashboard de visualisation et systemes de notification.
Integration systeme : Capacite a combiner toutes les briques (capteurs, broker MQTT, CSE oneM2M, Node-RED, dashboard) dans une architecture IoT coherente et fonctionnelle.
Points cles a retenir
1. MQTT est le protocole de reference pour l’IoT : Sa legerete, son modele publish/subscribe et ses niveaux de QoS en font le choix privilegie pour la telemetrie et la communication entre objets connectes.
2. oneM2M standardise l’interoperabilite M2M : Ce standard international fournit une couche d’abstraction au-dessus des protocoles de transport, permettant l’interoperabilite entre systemes heterogenes.
3. Node-RED accelere considerablement le prototypage : La programmation visuelle permet de passer rapidement de l’idee au prototype fonctionnel, ce qui est crucial dans les projets IoT ou l’iteration rapide est essentielle.
4. Le choix du protocole depend du cas d’usage : HTTP pour les API web, MQTT pour la telemetrie temps reel, CoAP pour les objets tres contraints. Il n’existe pas de solution universelle.
5. La securite IoT est un enjeu majeur : L’authentification, le chiffrement (TLS/DTLS) et le controle d’acces doivent etre integres des la conception de l’architecture.
Auto-evaluation
Ce cours a constitue ma premiere experience approfondie avec les protocoles IoT comme MQTT et le standard oneM2M. J’ai trouve ces technologies relativement accessibles grace aux nombreuses bibliotheques existantes et a la documentation disponible. La progression pedagogique des TP (de la ligne de commande Mosquitto a l’application Node-RED complete) a permis une montee en competence progressive et solide.
La mise en oeuvre pratique m’a permis de comprendre l’utilite concrete de ces concepts. J’ai par la suite reutilise certains de ces outils dans notre projet innovant pour mettre en place une communication efficace entre dispositifs, ce qui confirme la pertinence de cet enseignement.
La richesse du standard oneM2M m’a impressionne : la structure hierarchique des ressources, le systeme de droits d’acces et les mecanismes de notification permettent de construire des architectures IoT robustes et interoperables. Cependant, cette richesse implique une courbe d’apprentissage non negligeable.
Mon avis
Ce cours a ete l’un de mes favoris du semestre car il combine parfaitement les aspects materiel et logiciel. En tant qu’aspirant ingenieur en systemes embarques, cette association entre programmation de microcontroleurs et architectures logicielles middleware correspond exactement a mon profil de competences vise.
Points forts :
- Progression pedagogique exemplaire : MQTT en CLI, puis ESP8266, puis oneM2M, puis Node-RED
- Equilibre theorie/pratique avec des TP concrets et motivants
- Outils open-source accessibles pour continuer a pratiquer
- Lien direct avec les besoins de l’industrie IoT
Points a ameliorer :
- Plus de temps sur oneM2M (complexite du standard)
- Introduction de CoAP en pratique (pas seulement en theorie)
- Aspects securite plus approfondis (TLS, certificats)
- Scalabilite des architectures (clusters de brokers, load balancing)
La demarche progressive des labs a rendu l’apprentissage a la fois agreable et tres formateur. Partir de la communication MQTT basique en ligne de commande, evoluer vers la programmation Arduino avec la bibliotheque MQTT, puis integrer le tout avec Node-RED offre une vision complete de la chaine IoT. C’est exactement le type de cours qui prepare a des projets professionnels concrets.
Applications professionnelles
Ingenieur IoT :
- Concevoir des architectures de communication pour objets connectes
- Deployer et administrer des brokers MQTT a l’echelle
- Integrer des capteurs et actionneurs dans des plateformes IoT
Ingenieur systemes embarques :
- Programmer des microcontroleurs communicants (ESP8266, ESP32, STM32)
- Implementer des protocoles IoT sur des systemes contraints
- Optimiser la consommation energetique des communications
Architecte solutions M2M :
- Concevoir des plateformes interoperables basees sur oneM2M
- Definir les architectures middleware pour systemes industriels
- Assurer la scalabilite et la securite des infrastructures
Liens avec les autres cours :
- Cloud et Edge Computing - S9 : deploiement des brokers et CSE
- Security for Connected Objects - S9 : securisation MQTT/TLS
- Wireless Sensors Networks - S9 : couches basses des capteurs
- Service Oriented Architecture - S9 : API REST, microservices
Documents de Cours
Planning MOOC oneM2M
Planning et contenu du MOOC oneM2M suivi en autonomie : introduction au standard, architecture, types de ressources.
Rapports et Projets
Rapport Middleware for IoT - BE
Rapport complet du bureau d'etudes : architecture IoT deployee, integration MQTT, oneM2M et Node-RED, resultats experimentaux.
Rapport TP1-2 : MQTT et NodeMCU
Rapport des travaux pratiques 1 et 2 : installation Mosquitto, communication publish/subscribe, programmation ESP8266.
Cours suivi en 2024-2025 a l’INSA Toulouse, Departement Genie Electrique et Informatique, specialite ISS (Innovative Smart Systems).