Cours connexes:
- Middleware for IoT - S9 - Protocoles de communication securises
- Emerging Network Technologies - S9 - Securite reseau SDN
- Securite Materielle - S7 - Fondamentaux securite hardware
Security for Connected Objects
Annee academique : 2024-2025 Semestre : S9 Enseignants : E. Alata, V. Migliore Categorie : Securite IoT et Cryptographie
PART A : PRESENTATION GENERALE
Vue d'ensemble
Le cours “Security for Connected Objects” dispense par E. Alata et V. Migliore constitue un pilier essentiel de ma formation en securite des systemes connectes. Ce module couvre de maniere exhaustive les mecanismes de securite indispensables aux dispositifs IoT : cryptographie symetrique et asymetrique, fonctions de hachage, protocoles TLS/SSL, certificats numeriques et infrastructure a cles publiques (PKI), securite materielle, menaces specifiques a l’IoT, et methodologie d’analyse de risques EBIOS.
Le cours allie theorie approfondie et mise en pratique intensive a travers des travaux de laboratoire concrets : challenges CTF (Capture The Flag), attaques par injection SQL, attaques Man-in-the-Middle (MITM), migration TLS, et experimentation quantique. Cette approche m’a permis de developper une comprehension operationnelle de la securite des objets connectes.
Objectifs pedagogiques :
- Comprendre les fondements de la cryptographie moderne (symetrique, asymetrique, hachage)
- Maitriser les protocoles de securite pour les communications IoT (TLS/SSL, PKI)
- Identifier les faiblesses de securite dans une architecture IoT (OWASP IoT Top 10)
- Evaluer l’impact de l’exploitation d’une vulnerabilite de securite
- Proposer des contre-mesures de securite adequates
- Realiser une analyse de risques avec la methodologie EBIOS
- Apprehender la securite materielle : attaques par canaux auxiliaires, injection de fautes, elements securises
Position dans le cursus
Ce module s’inscrit dans une continuite pedagogique :
- Securite Materielle (S7) : attaques par canaux auxiliaires, buffer overflow, analyse de consommation
- Microcontroleurs et Hardware (S9) : systemes embarques, FPGA, architecture materielle
- Middleware for IoT (S9) : protocoles de communication securises (MQTT, TLS)
- Emerging Network Technologies (S9) : securite reseau SDN/NFV
Il prepare directement a :
- Projet Innovant (S9) : implementation AES et securisation d’un systeme IoT complet
- Carriere en cybersecurite : audit de securite, pentest, conception securisee
- Recherche : cryptographie post-quantique, securite hardware avancee
PART B : EXPERIENCE ET CONTEXTE
Organisation et ressources
Le module etait structure en cours magistraux et travaux pratiques intensifs :
Cours magistraux :
- Cryptographie symetrique (AES, DES, modes de chiffrement par blocs)
- Cryptographie asymetrique (RSA, ECC, Diffie-Hellman)
- Fonctions de hachage (SHA-256, MD5, fonctions legeres pour IoT)
- Certificats numeriques et PKI (Public Key Infrastructure)
- Protocoles TLS/SSL et securisation des communications
- Securite materielle (attaques par canaux auxiliaires, injection de fautes)
- Menaces specifiques IoT (OWASP IoT Top 10)
- Methodologie d’analyse de risques EBIOS
Travaux pratiques :
- Lab 1 : Injection SQL et Cross-Site Scripting (XSS)
- Lab 2 : Chiffrement symetrique et asymetrique (AES, RSA)
- Lab 3 : Attaque Man-in-the-Middle, migration TLS, certificats
- Lab 4 : Challenges CTF cryptographiques (flags)
- Lab Quantique : Distribution quantique de cles (QKD), protocole NEC
Ressources :
- Supports de cours : cryptography.pdf, Hardware-Security.pdf, ebios.pdf
- Outils : mbedTLS, pycryptodome, OpenSSL
- Rapports : Rapport Lab1 (injection SQL, XSS)
Environnement et contexte
Au cours de ce module, j’ai travaille sur les aspects theoriques et pratiques de la securite IoT. La pertinence de la securisation des dispositifs IoT dans le monde interconnecte actuel est evidente : chaque objet connecte represente une surface d’attaque potentielle. Les laboratoires pratiques m’ont permis d’appliquer les concepts appris en cours a des scenarios realistes, passant de la theorie cryptographique a l’exploitation concrete de vulnerabilites.
Mon role
Dans ce cours, j’ai ete responsable de :
- Comprendre et implementer divers protocoles de securite et techniques cryptographiques
- Mettre en oeuvre des mesures de securite pour les dispositifs IoT
- Mener des experimentations pour identifier et attenuer les vulnerabilites de securite
- Analyser et prevenir les attaques Man-in-the-Middle (MITM) sur les protocoles de communication IoT
- Realiser des challenges CTF pour tester mes competences en cryptanalyse
- Travailler avec la distribution quantique de cles (QKD) pour explorer la securite post-quantique
PART C : ASPECTS TECHNIQUES
Cette section explore en detail les aspects techniques de la securite des objets connectes, couvrant la cryptographie, les protocoles de securite, la securite materielle, les menaces IoT, et les travaux pratiques realises.
1. Cryptographie symetrique
La cryptographie symetrique utilise la meme cle pour le chiffrement et le dechiffrement. Elle est rapide et efficace pour le chiffrement de donnees volumineuses, mais necessite un canal securise pour la distribution de la cle.
1.1 AES (Advanced Encryption Standard)
L’AES est le standard de chiffrement symetrique mondial depuis 2001. Il chiffre les donnees par blocs de 128 bits avec des cles de 128, 192 ou 256 bits.
L’algorithme AES est compose de plusieurs rondes de traitement, chacune impliquant quatre operations principales :
-
AddRoundKey : chaque octet de l’etat est combine avec un bloc de la sous-cle de ronde par un XOR bit a bit. Cette etape est cruciale car elle introduit la cle dans le processus de chiffrement.
-
SubBytes : etape de substitution non lineaire ou chaque octet de l’etat est remplace par un autre via une S-box (boite de substitution). La S-box est concue pour resister aux cryptanalyses lineaires et differentielles.
-
ShiftRows : les lignes de l’etat sont decalees cycliquement vers la gauche. Le decalage depend de l’indice de la ligne. Cette etape assure la diffusion du texte clair.
-
MixColumns : operation de melange operant sur les colonnes de l’etat, combinant les quatre octets de chaque colonne. Cette etape garantit une diffusion supplementaire.
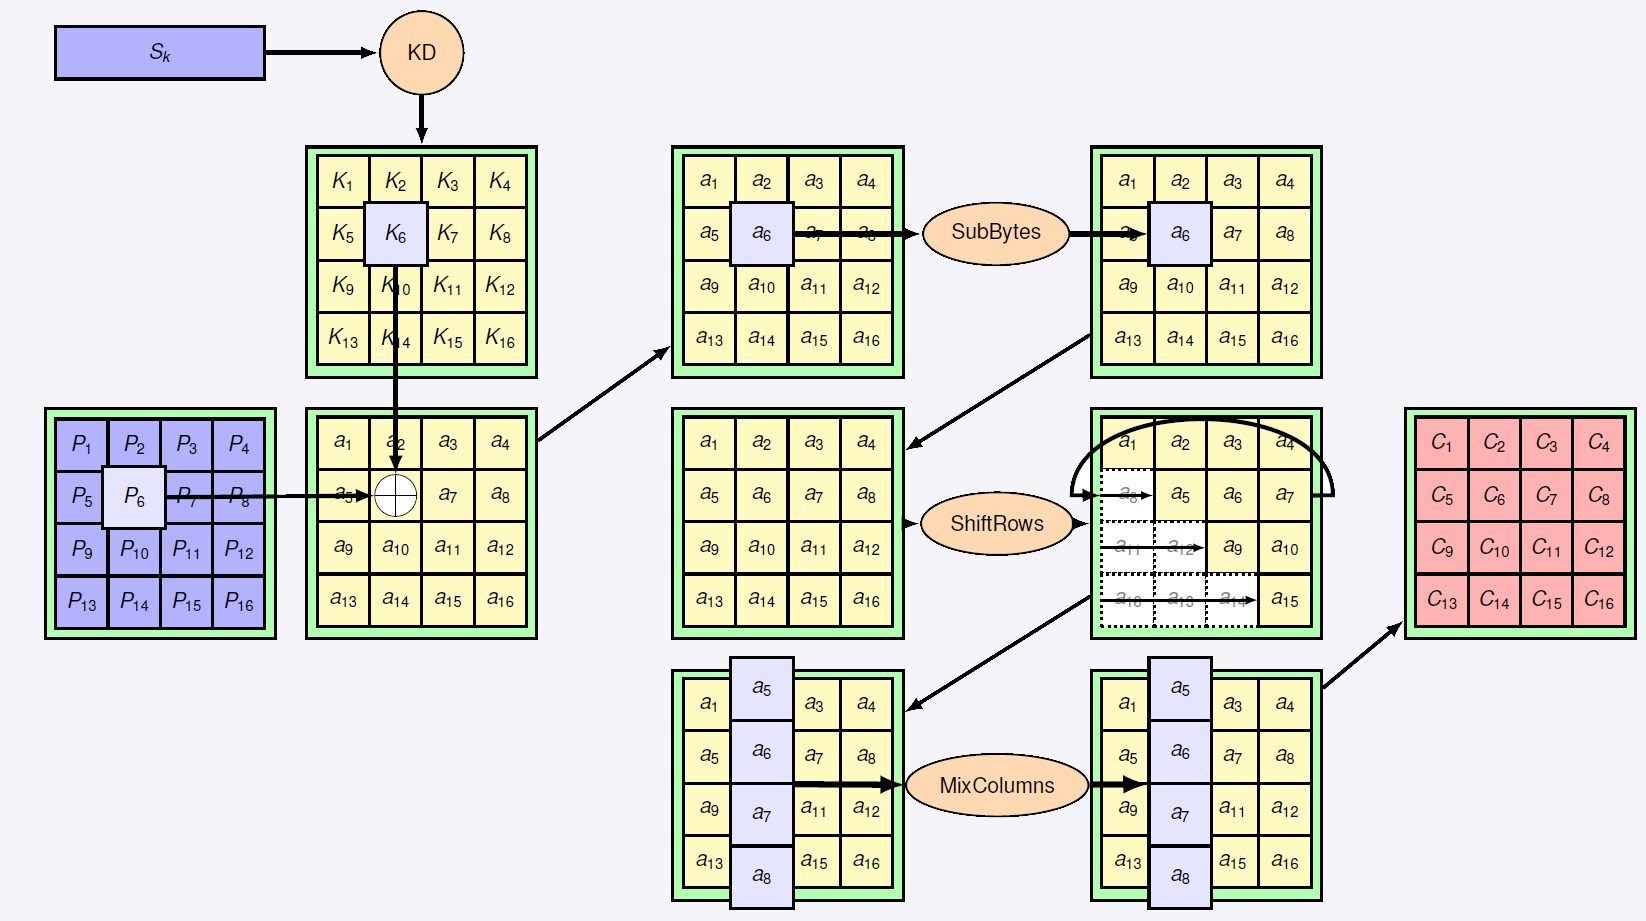
Figure : Etapes de l'algorithme AES - SubBytes, ShiftRows, MixColumns, AddRoundKey
Nombre de rondes selon la taille de la cle :
| Taille de cle | Nombre de rondes | Applications typiques |
|---|---|---|
| 128 bits | 10 rondes | Usage general, Wi-Fi (WPA2) |
| 192 bits | 12 rondes | Donnees sensibles |
| 256 bits | 14 rondes | Donnees classifiees, militaire |
Dans notre Projet Innovant (What a Leak), nous avons implemente l’algorithme AES avec des concepts supplementaires : vecteur d’initialisation (IV), padding, et PKCS#7.
1.2 DES (Data Encryption Standard)
Le DES, predecesseur de l’AES, utilise des blocs de 64 bits et une cle de 56 bits. Bien qu’obsolete aujourd’hui en raison de la taille reduite de sa cle (vulnerable au brute force), il reste important pour comprendre l’evolution de la cryptographie symetrique. Le Triple-DES (3DES) applique DES trois fois avec des cles differentes pour renforcer la securite.
1.3 Modes de chiffrement par blocs
Les modes de chiffrement definissent comment les blocs successifs sont traites :
| Mode | Description | Avantages | Inconvenients |
|---|---|---|---|
| ECB (Electronic Codebook) | Chaque bloc chiffre independamment | Simple, parallelisable | Motifs visibles, non securise |
| CBC (Cipher Block Chaining) | Chaque bloc XOR avec le bloc chiffre precedent | Masque les motifs | Sequentiel, erreur propagee |
| CTR (Counter) | Chiffrement d’un compteur, XOR avec le texte | Parallelisable, pas de padding | Compteur ne doit jamais se repeter |
| GCM (Galois/Counter Mode) | CTR + authentification integree | Chiffrement authentifie | Plus complexe |
1.4 Chiffre de Cesar
Nous avons egalement etudie le chiffre de Cesar, une technique de chiffrement simple ou chaque lettre du texte clair est decalee d’un nombre fixe de positions dans l’alphabet. Bien qu’il ne soit pas securise selon les standards modernes, il a permis de comprendre les bases du chiffrement et du dechiffrement par substitution.
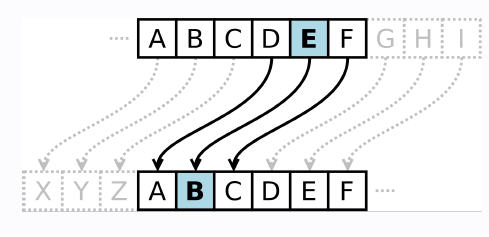
Figure : Principe du chiffre de Cesar - decalage alphabetique
2. Cryptographie asymetrique
La cryptographie asymetrique utilise une paire de cles (publique et privee) pour le chiffrement et le dechiffrement. Elle renforce la securite au prix de performances reduites par rapport au chiffrement symetrique.
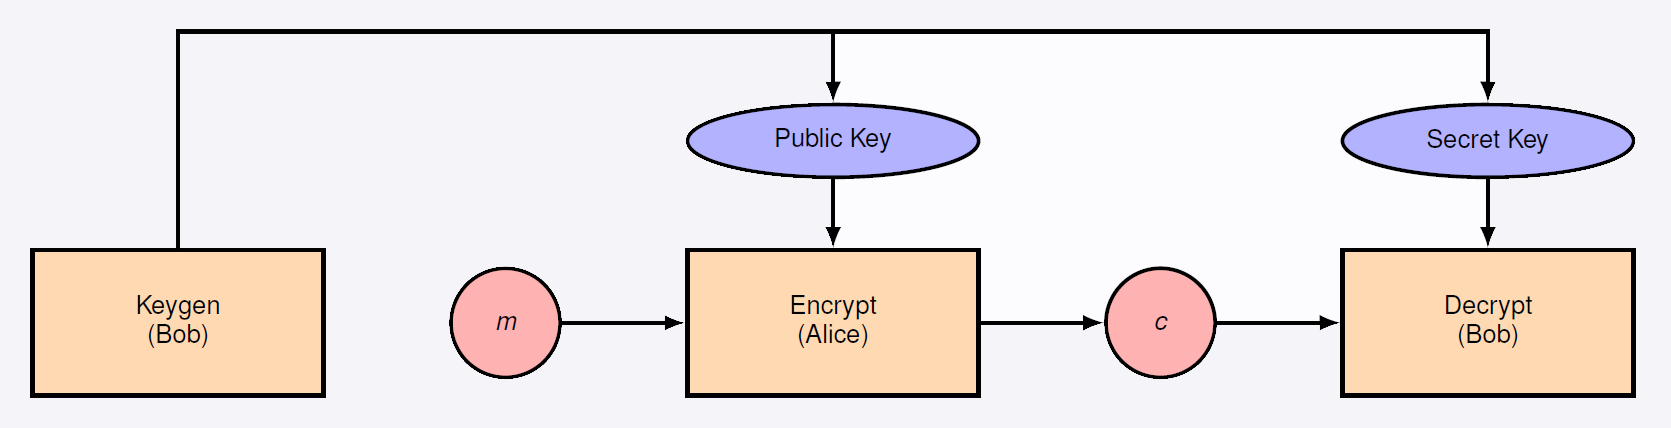
Figure : Principe de la cryptographie asymetrique - cle publique / cle privee
2.1 RSA (Rivest-Shamir-Adleman)
RSA est l’algorithme asymetrique le plus repandu. Sa securite repose sur la difficulte de factoriser de grands nombres premiers.
Principe :
- Generer deux grands nombres premiers p et q
- Calculer n = p * q (module)
- Calculer phi(n) = (p-1)(q-1)
- Choisir l’exposant public e (generalement 65537)
- Calculer l’exposant prive d = e^(-1) mod phi(n)
Chiffrement : C = M^e mod n Dechiffrement : M = C^d mod n
En laboratoire, nous avons implemente RSA dans le fichier 2/source.py : le script genere deux grands nombres premiers, calcule leur produit (n), et utilise l’exposant public (e) pour chiffrer un message. L’exposant prive (d) dechiffre le texte chiffre.
Attaque par racine cubique : Nous avons egalement explore une attaque sur RSA lorsque l’exposant public (e) est petit (e = 3). Si le texte chiffre (c) est suffisamment petit, on peut retrouver le texte clair en calculant la racine cubique entiere de c. Cette attaque a ete implementee dans 2/attack.py.

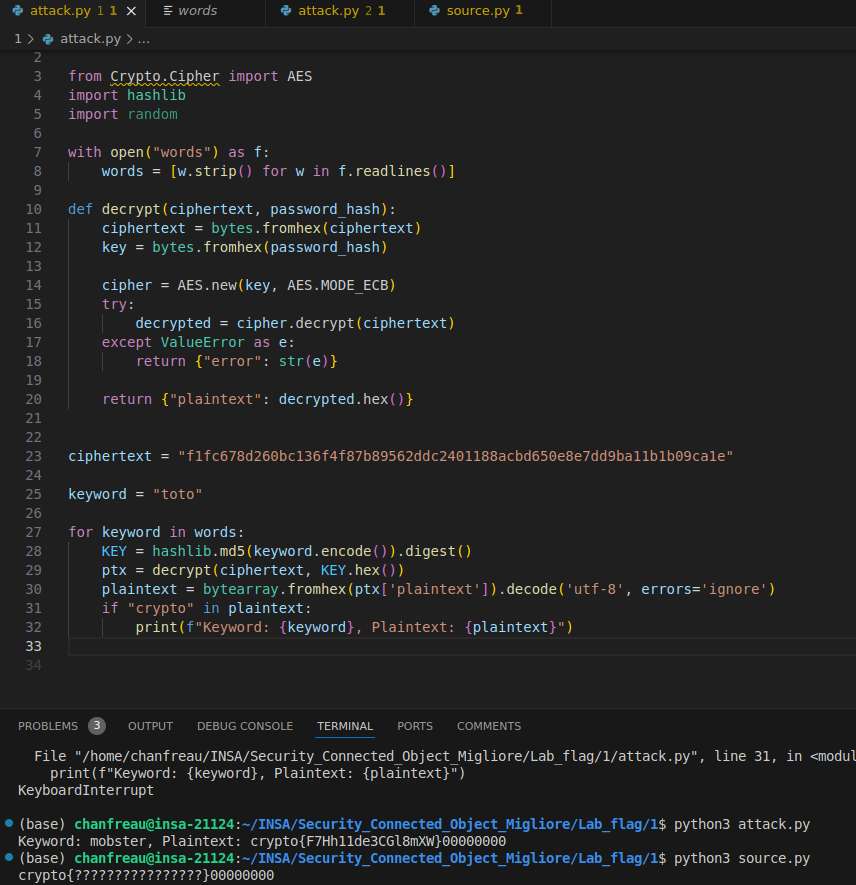
Figure : CTF - Flag obtenu apres attaque par racine cubique sur RSA
2.2 ECC (Elliptic Curve Cryptography)
La cryptographie sur courbes elliptiques offre un niveau de securite equivalent a RSA avec des cles beaucoup plus courtes. Une cle ECC de 256 bits equivaut a une cle RSA de 3072 bits. ECC est particulierement adaptee aux objets connectes grace a sa faible empreinte memoire et sa rapidite de calcul.
Avantages pour l’IoT :
- Cles plus courtes : moins de stockage et de bande passante
- Calculs plus rapides : moins de consommation energetique
- Securite equivalente : robustesse cryptographique maintenue
2.3 Diffie-Hellman
L’echange de cles Diffie-Hellman permet a deux parties d’etablir un secret partage sur un canal non securise, sans transmission directe de la cle. Ce protocole est a la base de nombreux protocoles de securite (TLS, IPsec, SSH).
Principe :
- Alice et Bob conviennent d’un nombre premier p et d’un generateur g
- Alice choisit un secret a, calcule A = g^a mod p, et envoie A
- Bob choisit un secret b, calcule B = g^b mod p, et envoie B
- Alice calcule la cle partagee : K = B^a mod p
- Bob calcule la meme cle : K = A^b mod p
La securite repose sur la difficulte du probleme du logarithme discret.
3. Fonctions de hachage
Les fonctions de hachage prennent une entree de taille arbitraire et produisent une empreinte de taille fixe. Elles sont utilisees pour la verification d’integrite des donnees, le stockage de mots de passe et les signatures numeriques.
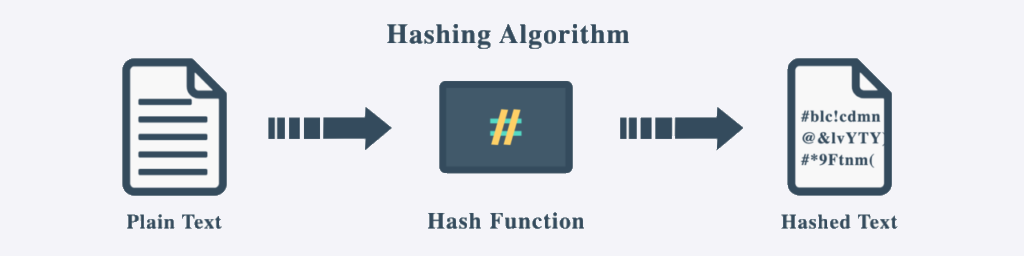
Figure : Principe d'une fonction de hachage - empreinte de taille fixe
Proprietes essentielles :
- Resistance a la pre-image : impossible de retrouver l’entree a partir du hash
- Resistance aux collisions : impossible de trouver deux entrees differentes produisant le meme hash
- Effet avalanche : un changement minime en entree modifie radicalement la sortie
3.1 SHA-256
SHA-256 (Secure Hash Algorithm) produit une empreinte de 256 bits (32 octets). C’est l’algorithme de hachage recommande pour la plupart des applications modernes, y compris les certificats numeriques et la blockchain.
3.2 MD5
MD5 produit une empreinte de 128 bits. Bien que tres repandu historiquement, il est considere comme compromis depuis la decouverte de collisions en 2004. Il reste utilise pour la verification rapide d’integrite de fichiers (checksums) mais ne doit plus etre employe pour des applications de securite.
Dans notre laboratoire cryptographique, MD5 a ete utilise pour generer une cle AES de 128 bits a partir d’un mot-cle selectionne aleatoirement. Cela a permis d’illustrer la generation de cles derivees (key derivation) a partir de mots de passe.
3.3 Fonctions de hachage legeres pour IoT
Nous avons etudie les fonctions de hachage legeres specifiees dans la norme ISO/IEC 29192-5:2016, concues pour les dispositifs a ressources limitees :
- PHOTON : fonction de hachage legere avec des tailles de permutation de 100, 144, 196, 256 et 288 bits, produisant des hash de 80, 128, 160, 224 et 256 bits respectivement.
- SPONGENT : fonction de hachage legere avec des tailles de permutation de 88, 136, 176, 240 et 272 bits, produisant des hash de 88, 128, 160, 224 et 256 bits respectivement.
- Lesamnta-LW : fonction de hachage legere avec une taille de permutation de 384 bits, produisant un hash de 256 bits.
4. Certificats numeriques et PKI
4.1 Infrastructure a cles publiques (PKI)
La PKI est un ensemble de roles, politiques et procedures necessaires pour creer, gerer, distribuer, utiliser, stocker et revoquer des certificats numeriques. Elle repose sur une chaine de confiance :
- Autorite de Certification (CA) : emet et signe les certificats
- Autorite d’Enregistrement (RA) : verifie l’identite des demandeurs
- Certificat X.509 : contient la cle publique, l’identite du proprietaire, la signature de la CA, la periode de validite
4.2 Common Name et verification
Dans le contexte de la verification des certificats, le Common Name (CN) est un attribut essentiel. Il fait partie du champ Subject du certificat et represente generalement le nom de domaine ou l’identite du detenteur du certificat. Lors du processus de verification, le CN est compare au nom d’hote ou a l’identite attendue pour s’assurer que le certificat est valide pour le destinataire prevu.
Par exemple, si un certificat est emis pour www.alice.com, le CN doit correspondre a www.alice.com. En cas de non-concordance, le processus de verification echouera, signalant un probleme de securite potentiel. Cette verification aide a prevenir les attaques Man-in-the-Middle en s’assurant que le certificat presente par un serveur correspond a l’identite attendue.
5. Protocoles TLS/SSL
5.1 TLS (Transport Layer Security)
TLS est le protocole de securite le plus deploye pour securiser les communications sur Internet. Il assure la confidentialite, l’integrite et l’authentification des echanges.
Fonctionnement du handshake TLS :
- ClientHello : le client envoie les suites cryptographiques supportees
- ServerHello : le serveur selectionne une suite et envoie son certificat
- Echange de cles : Diffie-Hellman ou RSA pour etablir un secret partage
- Derivation de cles : generation des cles de session a partir du secret
- Communication chiffree : echanges proteges par chiffrement symetrique (AES-GCM)
5.2 Migration TLS en laboratoire
Lors du Lab 3, nous avons travaille sur la migration TLS en utilisant la bibliotheque mbedTLS. L’objectif etait de securiser les communications entre Alice et Bob en implementant un handshake TLS complet, incluant l’echange de certificats, la verification de la chaine de confiance, et le chiffrement des messages.
6. Securite materielle
La securite materielle traite des vulnerabilites physiques des systemes electroniques. Meme un algorithme mathematiquement sur peut etre compromis par des attaques sur son implementation physique.
6.1 Attaques par canaux auxiliaires (Side-Channel Attacks)
Les attaques par canaux auxiliaires exploitent les fuites d’information physiques lors de l’execution d’algorithmes cryptographiques :
| Type d’attaque | Canal exploite | Technique |
|---|---|---|
| Timing Attack | Temps d’execution | Mesure des variations temporelles |
| Power Analysis (SPA/DPA/CPA) | Consommation electrique | Correlation entre donnees et consommation |
| EM Analysis | Emissions electromagnetiques | Capture des radiations EM |
| Cache Attack | Comportement du cache CPU | Flush+Reload, Prime+Probe |
Exemple sur AES : Les tables de substitution (S-box) d’AES sont stockees en memoire. L’acces a ces tables depend de la cle et du message. Si une partie de la table est en cache (acces rapide) et une autre non (acces lent), on peut deduire quelle partie a ete accedee et progressivement recuperer la cle.
6.2 Injection de fautes (Fault Injection)
L’injection de fautes provoque volontairement des erreurs lors de l’execution pour obtenir des informations ou contourner des protections :
- Clock glitching : impulsions sur l’horloge causant des instructions sautees
- Voltage glitching : variation de la tension d’alimentation causant des erreurs de calcul
- Laser : faisceau laser focalise modifiant des bits en memoire
6.3 Elements securises (Secure Elements)
Les elements securises sont des composants materiels dedies a la protection des donnees sensibles :
- TPM (Trusted Platform Module) : puce securisee pour le stockage de cles et l’attestation
- Secure Enclave : environnement d’execution isole (ARM TrustZone, Intel SGX)
- HSM (Hardware Security Module) : module materiel haute securite pour la gestion de cles
Ces elements sont essentiels dans l’IoT pour proteger les cles cryptographiques, les identites des dispositifs, et assurer le demarrage securise (Secure Boot).
7. Menaces specifiques a l'IoT - OWASP IoT Top 10
L’OWASP (Open Web Application Security Project) identifie les 10 principales vulnerabilites des objets connectes :
| Rang | Vulnerabilite | Description |
|---|---|---|
| 1 | Mots de passe faibles | Identifiants par defaut, non modifies |
| 2 | Services reseau non securises | Ports ouverts, services inutiles exposes |
| 3 | Interfaces ecosysteme non securisees | API, cloud, interfaces web vulnerables |
| 4 | Absence de mecanisme de mise a jour | Pas de firmware OTA securise |
| 5 | Composants non securises ou obsoletes | Bibliotheques vulnerables |
| 6 | Protection insuffisante de la vie privee | Collecte excessive de donnees |
| 7 | Transfert et stockage de donnees non securises | Donnees en clair |
| 8 | Manque de gestion des dispositifs | Inventaire, monitoring insuffisants |
| 9 | Parametres par defaut non securises | Configurations usine dangereuses |
| 10 | Manque de durcissement physique | Acces physique non protege |
8. Methodologie d'analyse de risques EBIOS
EBIOS (Expression des Besoins et Identification des Objectifs de Securite) est la methode francaise de reference pour l’analyse de risques en securite de l’information, developpee par l’ANSSI.
Les 5 ateliers EBIOS Risk Manager :
- Cadrage et socle de securite : identifier les missions, les valeurs metier, et le perimetre
- Sources de risque : identifier les sources de menace et leurs objectifs vises
- Scenarios strategiques : elaborer les chemins d’attaque de haut niveau
- Scenarios operationnels : detailler les modes operatoires techniques
- Traitement du risque : definir les mesures de securite et le plan d’action
Cette methodologie est particulierement pertinente pour les systemes IoT ou les surfaces d’attaque sont multiples (reseau, physique, cloud, firmware).
9. Confidentialite, integrite et authenticite
Les trois piliers fondamentaux de la securite de l’information (triade CIA) :
- Confidentialite : garantir que l’information n’est accessible qu’aux personnes autorisees. Assuree par le chiffrement (AES, RSA, TLS).
- Integrite : garantir que l’information est exacte et n’a pas ete alteree. Assuree par les fonctions de hachage (SHA-256) et les MAC (Message Authentication Code).
- Authenticite : verifier l’identite des parties impliquees dans la communication. Assuree par les signatures numeriques et les certificats (PKI).
10. Travaux pratiques - Labs de securite
10.1 Injection SQL (Lab 1)
J’ai etudie les attaques par injection SQL et comment elles peuvent etre utilisees pour extraire des informations d’une base de donnees. Par exemple, en entrant admin' OR 1=1 OR '1'='1 dans le champ d’authentification et un mot de passe arbitraire comme vhjvg, un attaquant peut contourner le mecanisme d’authentification. La requete SQL devient toujours vraie, permettant un acces non autorise aux donnees sensibles. Comprendre cette vulnerabilite m’a aide a implementer des mesures de prevention dans les systemes IoT.
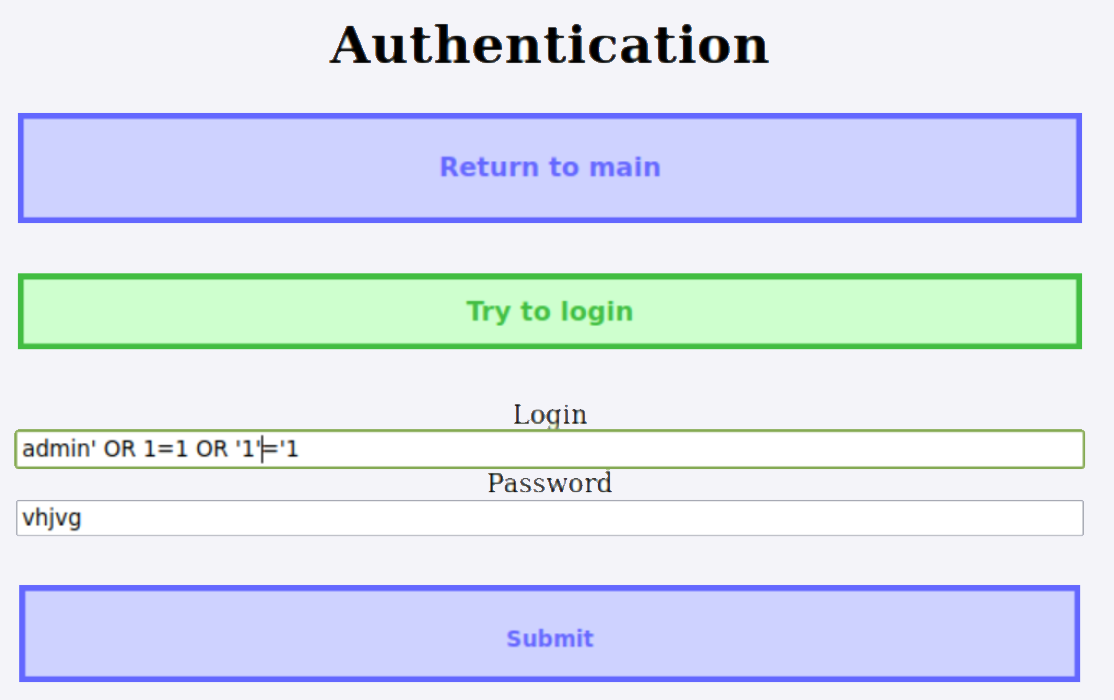
Figure : Demonstration d'une attaque par injection SQL - contournement de l'authentification
Mesures de prevention :
- Utilisation de requetes parametrees (prepared statements)
- Validation et assainissement des entrees utilisateur
- Principe du moindre privilege pour les comptes de base de donnees
- Utilisation d’un ORM (Object-Relational Mapping)
10.2 Cross-Site Scripting - XSS (Lab 1)
Nous avons explore les attaques XSS, qui impliquent l’injection de scripts malveillants dans les pages web consultees par d’autres utilisateurs. Cela peut mener au vol de donnees, au detournement de session, et a d’autres activites malveillantes.
Par exemple, nous avons execute du code JavaScript dans le champ de nom d’utilisateur en entrant <script>alert('Bonjour');</script> ou <script>document.write("<img src='xxxx'/>");</script>. Cela a demontre comment un attaquant pourrait injecter des scripts pour manipuler la page web ou voler des informations. Les repercussions de telles attaques peuvent etre severes : acces non autorise aux donnees utilisateur et propagation de malwares.
10.3 Attaque Man-in-the-Middle - MITM (Lab 3)
J’ai etudie les attaques Man-in-the-Middle, ou un attaquant intercepte et altere potentiellement la communication entre deux parties sans leur connaissance. Ce type d’attaque peut mener a des violations de donnees et a un acces non autorise a des informations sensibles.
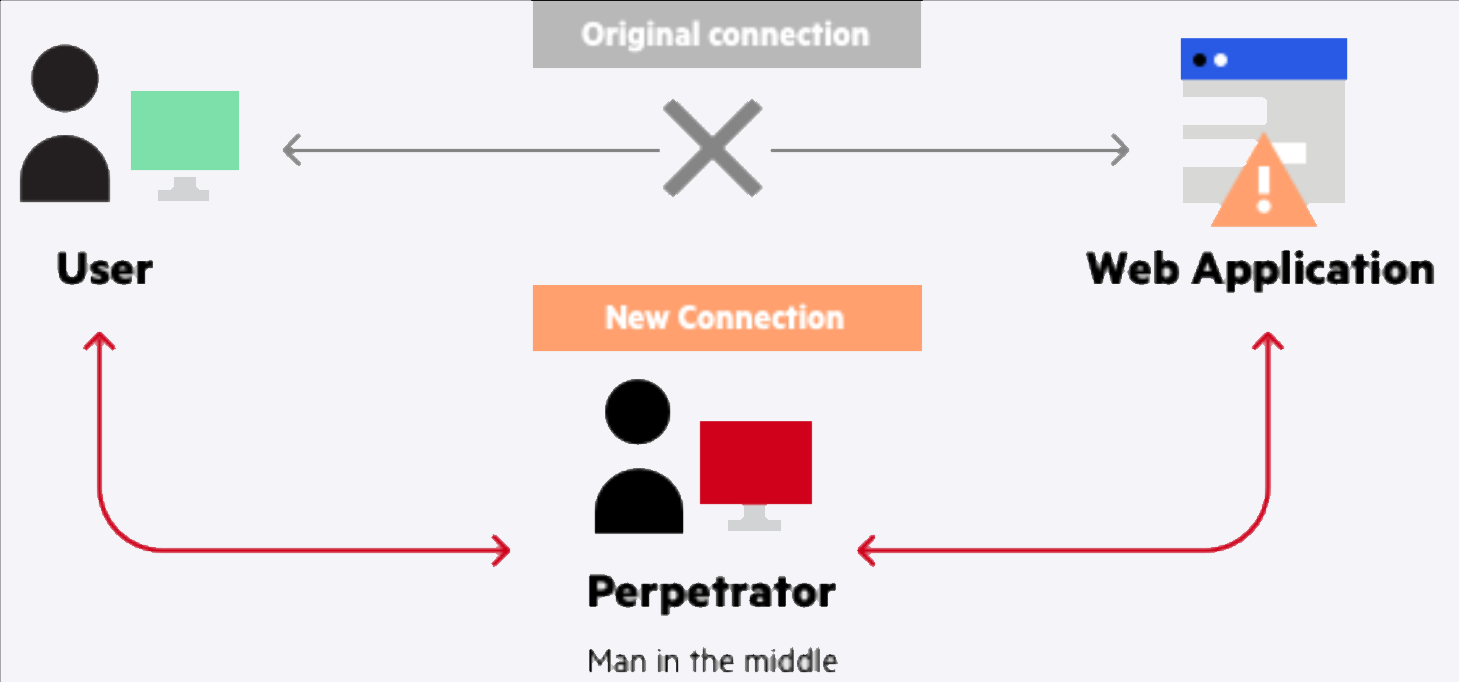
Figure : Schema d'une attaque Man-in-the-Middle - interception des communications
Dans le fichier attaquant, nous avons implemente une attaque MITM simple en utilisant la bibliotheque mbedTLS. L’attaquant intercepte et modifie les messages entre Alice et Bob. L’attaquant lit le message de Bob, l’altere, puis envoie le message modifie a Alice. Cela demontre comment un attaquant peut manipuler la communication entre deux parties, soulignant l’importance de securiser les communications.

Figure : Terminal Lab3 - Interception et modification de messages par l'attaquant
Lors du Lab 3, nous avons travaille sur un scenario ou Alice envoie un certificat a Bob. Bob recoit le certificat et le verifie. Simultanement, un hacker intercepte et imprime la cle. Bob envoie ensuite un message a Alice, mais le hacker intercepte le message, l’altere, et envoie le message modifie a Alice.

Figure : Lab3 - Scenario d'interception de certificat et de cle
Correction :
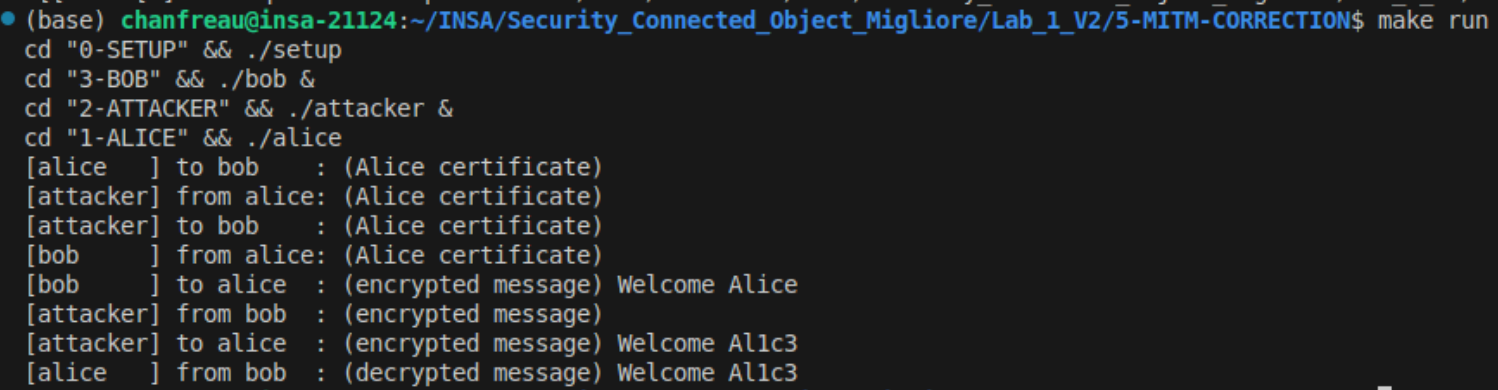
Figure : Lab3 - Correction et verification du Common Name
10.4 Migration TLS (Lab 3)
La migration TLS consistait a securiser les communications en implementant le protocole TLS complet avec mbedTLS. L’objectif etait de passer d’une communication en clair a une communication chiffree et authentifiee, en integrant :
- L’echange de certificats X.509
- La verification de la chaine de confiance
- Le chiffrement des messages avec AES-GCM
- La protection contre les attaques de rejeu (replay attacks)
10.5 Challenges CTF cryptographiques (Lab 4)
Chiffrement AES - CTF
Dans le fichier 1/source.py, nous avons implemente le chiffrement et le dechiffrement AES en utilisant la bibliotheque pycryptodome :
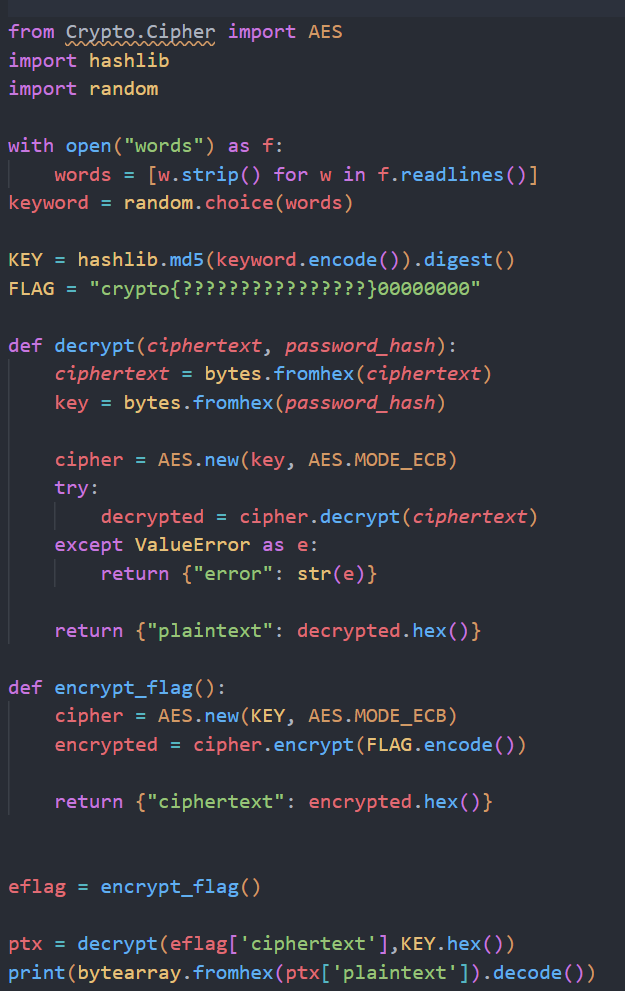
Figure : CTF - Flags obtenus apres dechiffrement AES par brute force sur dictionnaire
Le processus du challenge :
- Selection du mot-cle : le script lit une liste de mots depuis un fichier
wordset en selectionne un aleatoirement - Generation de la cle : le mot-cle selectionne est hache avec MD5 pour generer une cle AES de 128 bits
- Chiffrement du flag : le flag predefini est complete (padding) a un multiple de la taille de bloc AES (16 octets) et chiffre en mode ECB
- Dechiffrement du flag : le flag chiffre est dechiffre avec la meme cle pour valider le processus
Chiffrement RSA - CTF

Figure : CTF - Flag obtenu apres exploitation de la vulnerabilite RSA
11. Lab Quantique
11.1 Protocole NEC
Nous avons etabli une communication entre deux cartes en utilisant le protocole NEC, couramment utilise dans les telecommandes. L’emetteur encode les messages en format NEC et les envoie via des impulsions infrarouges. Le recepteur decode ces signaux pour retrouver le message original.
Exemple :
- Emetteur : encode “A” en format NEC et l’envoie
- Recepteur : decode le signal infrarouge pour retrouver “A”
Cet exercice a demontre l’importance de la precision du timing et de la fiabilite dans la communication infrarouge.
Donnees du signal pour “A” :
- Format NEC : le protocole NEC utilise une trame de 32 bits. Pour le caractere “A”, les donnees du signal sont encodees comme suit :
- Adresse : 0x8D
- Adresse inverse : 0x72
- Commande : 0x45 (code ASCII pour “A”)
- Commande inverse : 0x4E
La trame complete de 32 bits pour “A” est : 0x8D72454E.
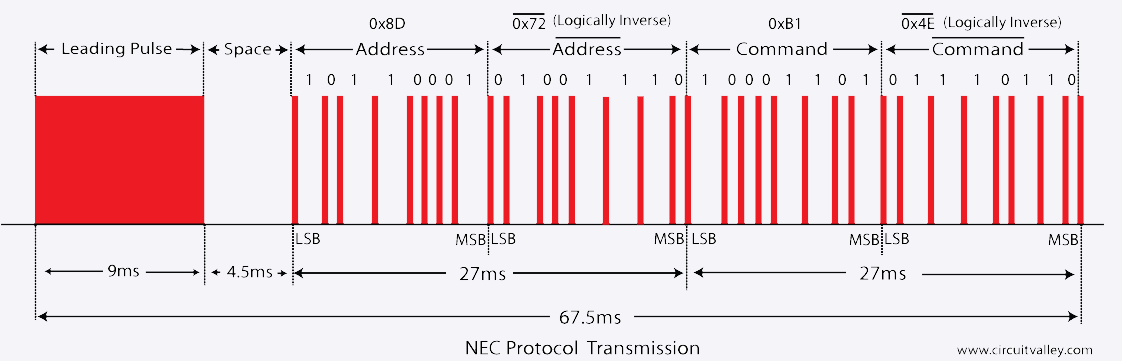
Figure : Protocole NEC - Structure de la trame infrarouge
11.2 Distribution quantique de cles (QKD)
Apres avoir realise le test classique sur /dev/tty1CM0, nous avons procede au test quantique sur /dev/ttyACM1. Nous avons d’abord effectue une calibration en reglant l’angle a 0, la resolution de balayage a 1, l’offset a 0, et la polarisation a 0. Nous avons ensuite converti le signal de luminosite en tension en balayant et mesurant l’intensite apres le polariseur lineaire lors d’une rotation complete de 360 degres. Suite a la calibration, nous avons execute un script Python pour automatiser la distribution de cles et generer une cle de 32 kbit.
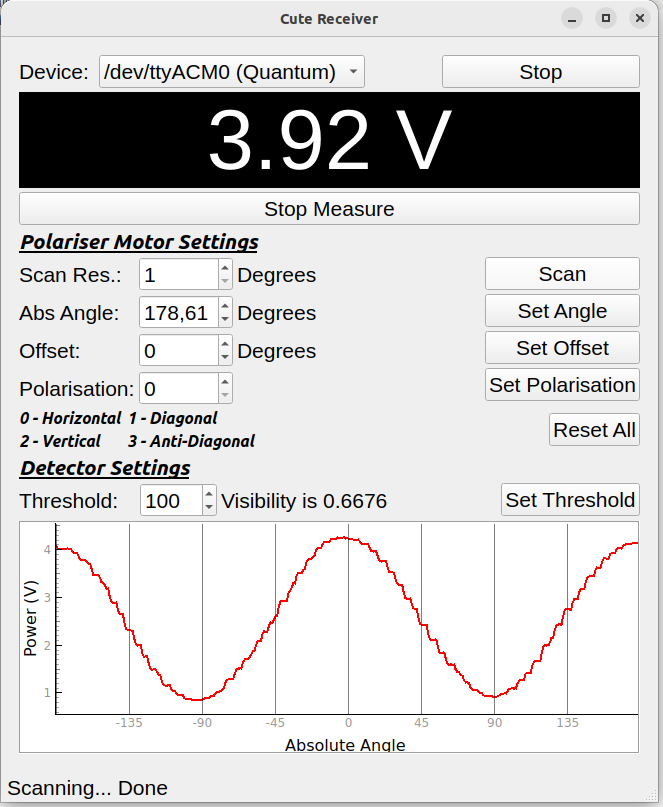
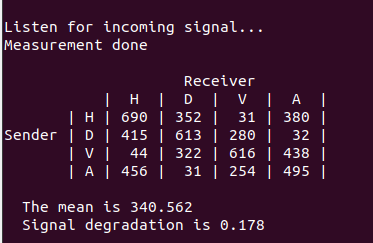
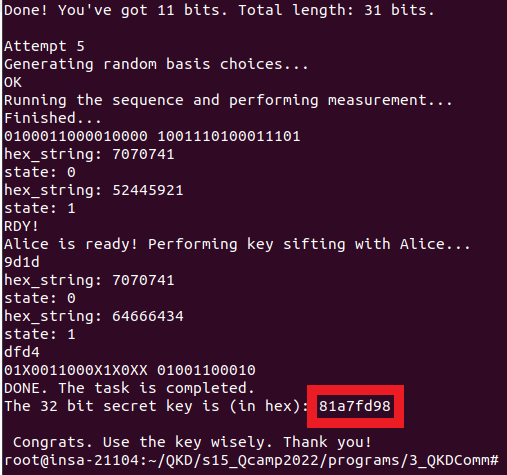
Figure : Distribution quantique de cles - Montage experimental et generation de cle
De plus, nous avons introduit un prisme dans le montage, permettant aux signaux lumineux de Bob, Alice et Eve de le traverser. Cela a ete realise pour faciliter le partage de la cle avec un autre utilisateur. Le prisme a aide a diviser les signaux lumineux, assurant que la distribution de la cle puisse etre partagee de maniere securisee avec le nouvel utilisateur sans compromettre l’integrite de la communication originale.
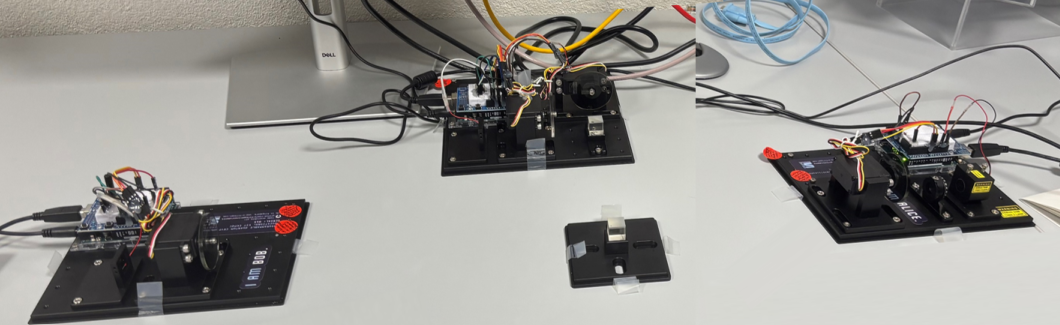
Figure : Montage avec prisme - Partage de cle quantique multi-utilisateurs
PART D : ANALYSE ET REFLEXION
Competences acquises
Maitrise de la cryptographie : Capacite a comprendre, implementer et evaluer les algorithmes cryptographiques (AES, RSA, ECC, fonctions de hachage) et a choisir les solutions adaptees aux contraintes IoT.
Securisation des communications : Aptitude a mettre en oeuvre les protocoles TLS/SSL, a gerer les certificats numeriques via une PKI, et a securiser les echanges entre dispositifs IoT.
Analyse de vulnerabilites : Competence en identification et exploitation de failles de securite (injection SQL, XSS, MITM) pour mieux concevoir des contre-mesures.
Securite materielle : Comprehension des attaques par canaux auxiliaires, de l’injection de fautes, et des elements securises pour la protection physique des dispositifs.
Analyse de risques : Capacite a conduire une analyse de risques methodique (EBIOS) adaptee aux systemes IoT.
Vision globale : Integration de la securite dans l’ensemble du cycle de vie d’un systeme IoT, de la conception au deploiement.
Points cles a retenir
1. La securite est multicouche : La protection d’un systeme IoT necessite des mesures a tous les niveaux : physique, reseau, applicatif, et organisationnel. Une approche de defense en profondeur est indispensable.
2. La cryptographie est necessaire mais pas suffisante : Un algorithme mathematiquement sur peut etre vulnérable si son implementation fuit des informations (canaux auxiliaires). La securite depend de la qualite de l’implementation autant que de l’algorithme.
3. L’IoT amplifie les risques : Le nombre massif de dispositifs, les contraintes de ressources, et les mises a jour difficiles rendent la securite IoT particulierement complexe.
4. La pratique est essentielle : Les labs CTF, les attaques MITM, et les injections SQL m’ont permis de passer de la theorie a la pratique, renforant ma comprehension operationnelle.
5. Le quantique est l’avenir : L’experimentation QKD a ouvert une perspective fascinante sur la cryptographie post-quantique et la distribution securisee de cles.
Retour d'experience
J’avais deja un premier apercu de la plupart de ces concepts, mais ce cours a fourni une perspective plus avancee et technique. Nous avons approfondi le codage en C avec mbedTLS et teste des attaques par injection SQL. Ce dernier point a ete un peu difficile pour moi puisque je n’avais jamais utilise SQL auparavant, et j’ai du apprendre rapidement pour etre efficace.
Par ailleurs, de nombreux concepts expliques en cours n’ont pas ete pratiques. J’ai le sentiment de ne pas etre totalement a jour partout car certains sujets restaient purement theoriques. Les explications du professeur pendant les cours etaient un plus pour moi car elles etaient claires, et je voulais etre operationnel sur ces concepts.
De plus, travailler seul pendant les sessions de laboratoire m’a pousse a travailler plus intensement pour comprendre tous les concepts en profondeur.
Mon avis
Ce cours a ete tres interessant et stimulant. J’ai beaucoup appris sur les vulnerabilites de securite et comment les prevenir. Dans ma future carriere, je suis interesse par le domaine de la securite, ce qui signifie que je dois rester informe des dernieres menaces. J’ai vraiment apprecie les travaux pratiques qui m’ont permis d’appliquer les concepts appris en cours, et je suis un peu decu que nous n’ayons pas eu plus de temps pour explorer d’autres concepts de securite.
A la fin du semestre, nous avons eu un lab quantique qui etait vraiment passionnant. Malheureusement, nous etions la “classe test” car personne ne l’avait fait auparavant. Meme si nous avons rencontre quelques problemes pour le finaliser, travailler en partenariat avec les enseignants a ete une excellente experience. J’espere decouvrir davantage le quantique a l’avenir car c’est un domaine fascinant.
Perspectives professionnelles
Pour ingenieur en securite IoT :
- Audit de securite de systemes connectes
- Conception de produits IoT securises (secure by design)
- Tests de penetration et red teaming sur les systemes embarques
Pour developpeur embarque :
- Implementation correcte des algorithmes cryptographiques
- Integration de TLS/SSL dans les communications IoT
- Utilisation d’elements securises (TPM, Secure Enclave)
Lien avec le Projet Innovant : Les competences acquises dans ce cours ont ete directement appliquees dans notre Projet Innovant (What a Leak), ou nous avons implemente le chiffrement AES avec vecteur d’initialisation et padding PKCS#7 pour securiser les communications de notre systeme IoT de detection de fuites d’eau.
Rapports et Projets
Rapport de Laboratoire - Lab 1 (Injection SQL, XSS)
Ouvrir le rapport complet - Lab 1
Cours suivi en 2024-2025 a l’INSA Toulouse, Departement Genie Electrique et Informatique, Semestre 9.